
OVERCLOCKING
Now that we know what hardware to use, and have familiarized ourselves with the necessary software, Its time to get to overclocking that CPU!
First, you’ll want to enter into your motherboard’s BIOS/UEFI, to do this you simply restart your computer and hold down the DEL key while it boots, and you should automatically enter into the UEFI. If not, you’ll want to consult your motherboard’s manual for finding out exactly how to enter. However, we’re fairly certain this should work every time, regardless of the manufacturer or model.
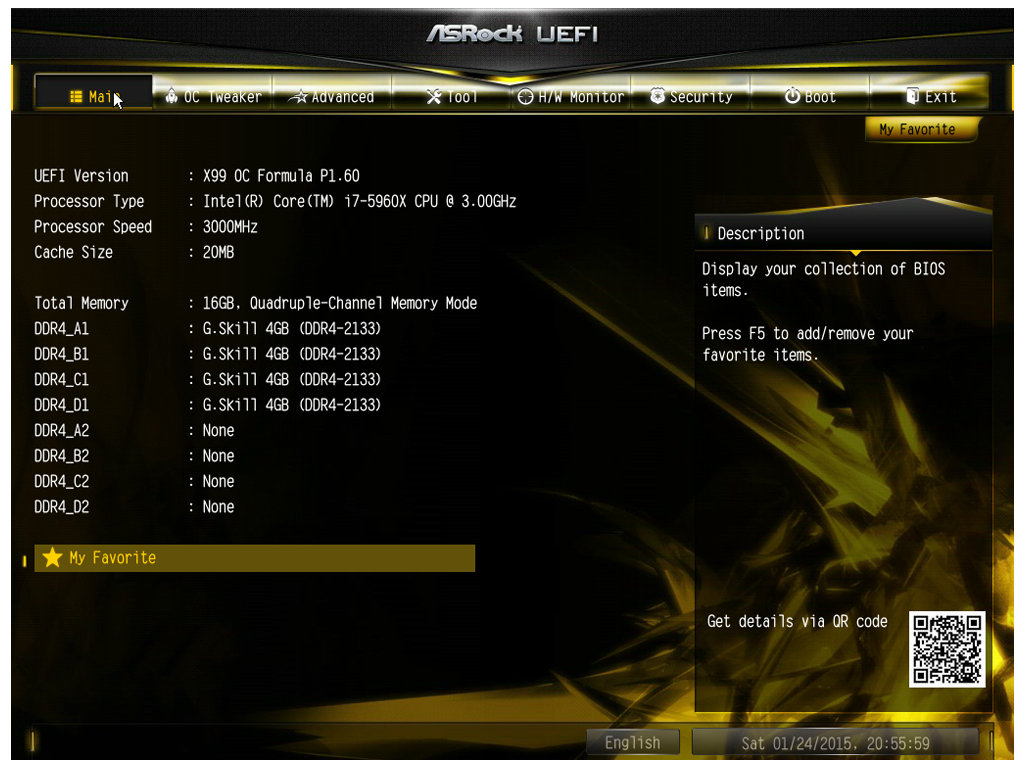 Once in the UEFI, you’ll be greeted with a screen that should look similar to the one above. Of course, different manufacturers will have different UEFI layouts, they should all be similar enough that this guide will still be fairly easy to follow with your own motherboard.
That being said, unlike our ASRock board some motherboard manufacturers will have an “EZ” or “Beginner” mode by default in the UEFI, this will hide the more advanced settings we’ll need to access in order to overclock our CPU. For ASUS motherboards, you’d simply press F7, or click “Advanced” on the bottom right of the UEFI screen.
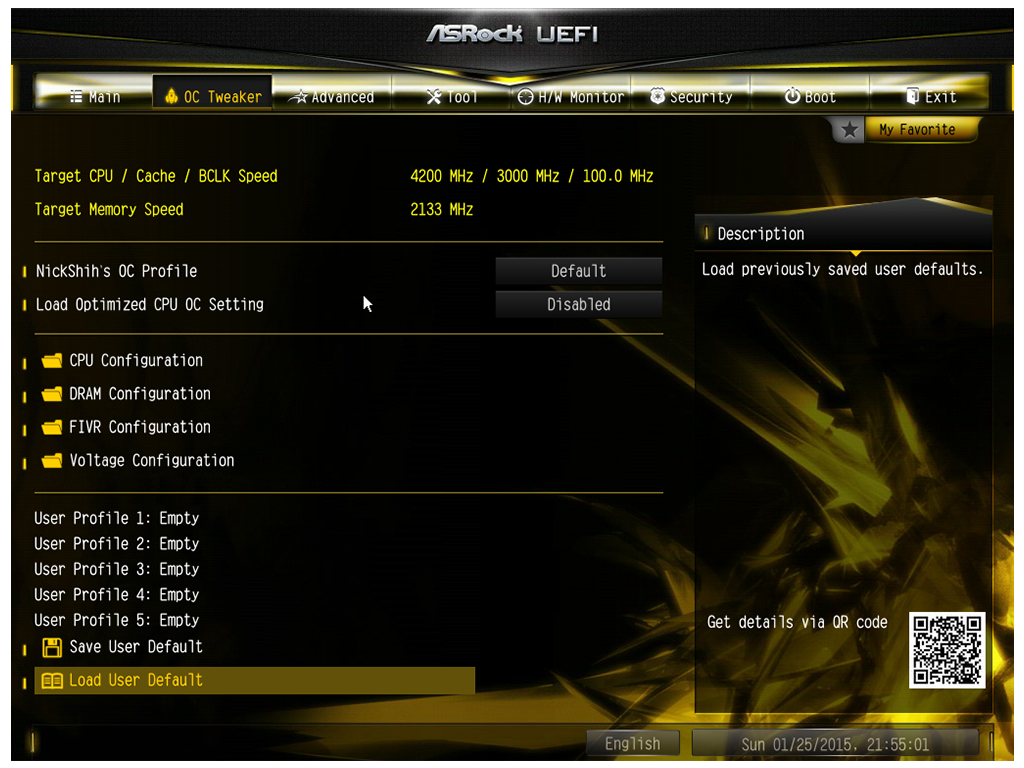 With all that out of the way, we’ll proceed on to the “OC Tweaker” tab of our UEFI, once again this will likely be called something else on non-ASRock motherboards. For example ASUS calls theirs “Extreme Tweaker” either way, it should be fairly easy to identify, if not you may want to consult your motherboard’s manual.
On this screen, we’ll see four basic sub-categories which includes: CPU Configuration; this is where we’ll adjust our CPU frequency. DRAM Configuration; For adjusting various memory settings and enabling XMP. FIVR Configuration; This is where we’ll find CPU VCore Voltage settings. Voltage Configuration; This is where we’ll find various voltage settings for our system, for the most part we won’t need to spend any time in here, unless we want to do some more advanced tweaking, which is beyond the scope of this guide.
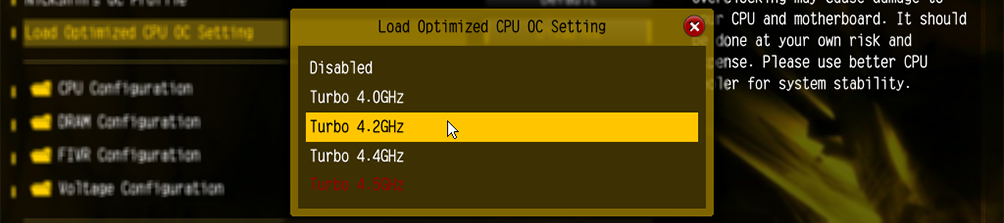
Also on this screen, we’ll find “Load Optimized CPU OC Setting” which will usually be called something like “OC Presets” essentially, they are a list of preset profiles created by the motherboard manufacturer, that allow the user to overclock their CPU with a single click. In reality, most users can click on the profile they desire, boot into their system, run a stress test and then walk away. If you decide to go this route, we don’t blame you. However, we’re still going to show you how to get it done the old-fashioned way.
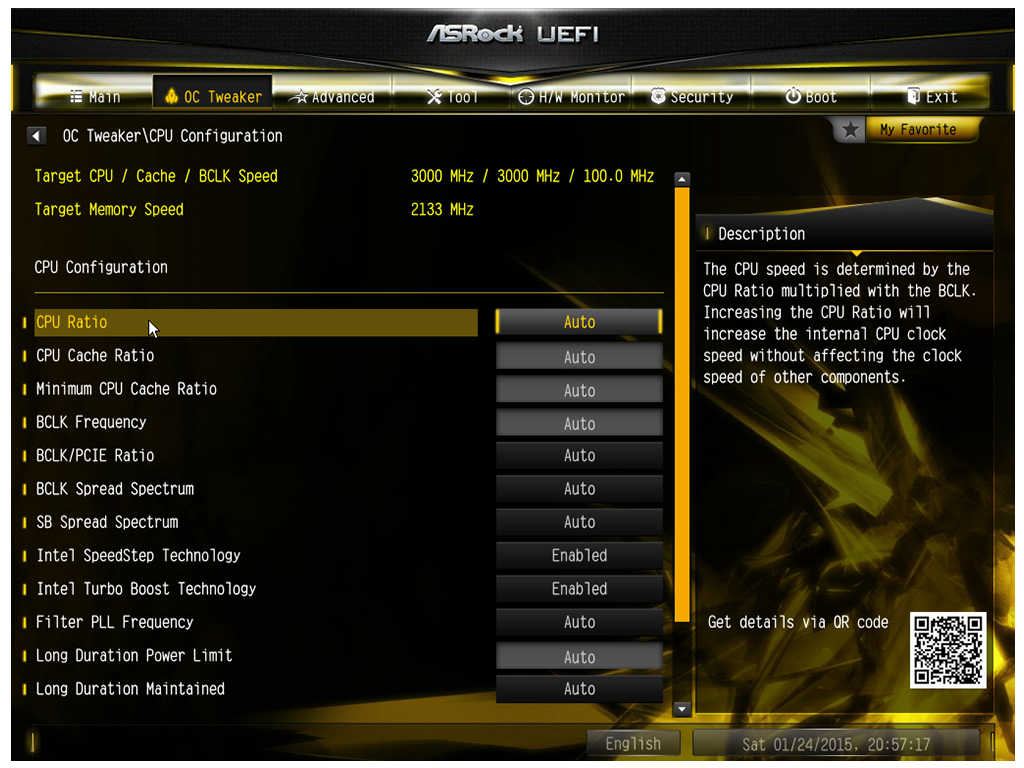
Now, we’ll move on to the “CPU Configuration” screen, here we’ll find various CPU settings including CPU Ratio and BCLK Frequency, everything else is not very important for this guide, but can be useful for more advanced overclocks and tweaking. Basically, our BCLK or Base Block, is multiplied by our CPU Ratio, and gives us our final Core Clock Frequency. By default they will be set to 100MHz on the BCLK and 30 for the CPU Ratio giving us a Core Clock Frequency of 3000 MHz or 3.0GHz.

First things first, we’ll need to change our CPU Ratio from ‘Auto’ to ‘All Core’, which will allow us to manually set our multiplier for all CPU cores.

Now, once we’ve done that, we’ll want to change our actual CPU Core Ratio in order to achieve our desired overclock, in this guide we’ll be going for an overclock of 4200MHz or 4.2GHz, which would result in a 40% increase over the stock 3.0GHz of our 5960X. In order to do this, we’ll need to change our multiplier from 30 to, you guessed it … 42! Easy enough, right? 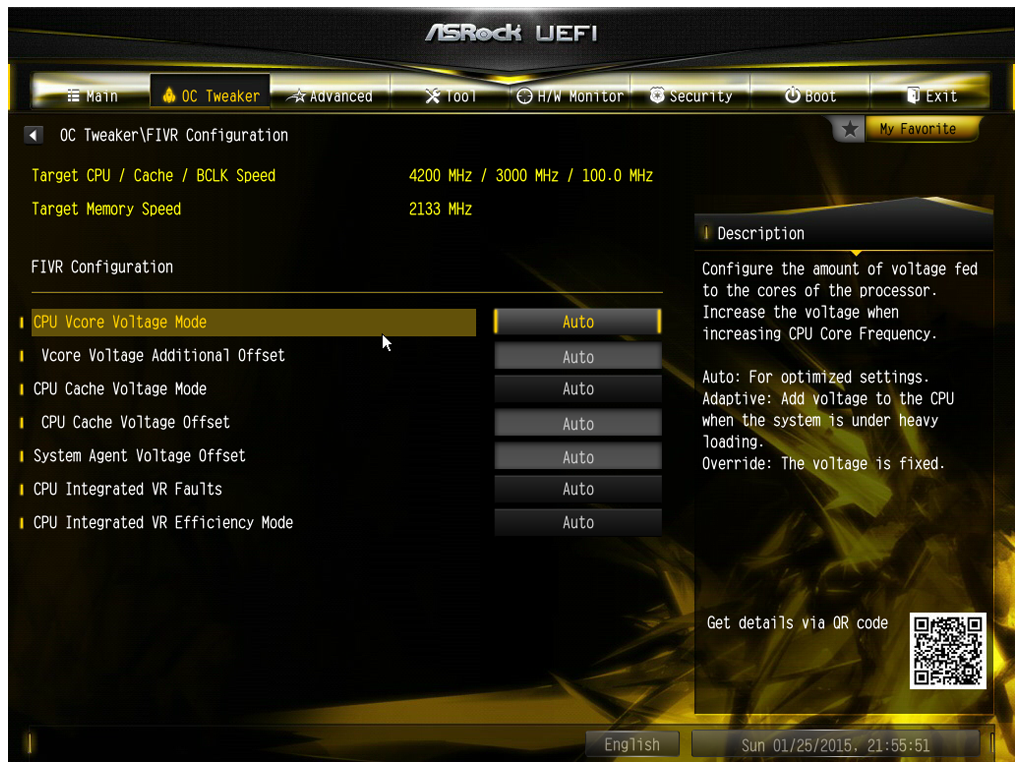
Once that’s done, it’s time to go back and enter the “FIVR Configuration” screen, where we’ll find our CPU Vcore Voltage settings. By default, it will be set to auto, however we’ll need to change that as our now overclocked CPU will require more voltage.

On most motherboards, there will be three VCore Voltage modes: Auto; which will usually set the VCore to stock settings. Adaptive; which will let you let you add a specified amount of voltage in addition to the stock values, and Override; which will allow us to choose a fixed voltage for our CPU. We will select Override, as it is the simplest approach.

Adjusting CPU voltage can be very tricky; not setting enough can result in system instability such as failing to boot or crashing during stress tests. However, too much voltage can result in greatly increased temperatures, system instability and even hardware failure. That being said, as long as we stick within our limits, we should be safe.
Our UEFI states that the voltage must be between 0.800v and 2.000v, the latter of which will be going nowhere near. For this platform, at 4.2GHz we like to start with a VCore Voltage of 1.200v. After we set our voltage, save our changes (usually F10, if not consult your manual) and reboot into Windows. If the system fails to boot or crashes, go back into the UEFI and add an additional 0.010 voltage, so if you’re at 1.200v, then change it to 1.210v and try again.
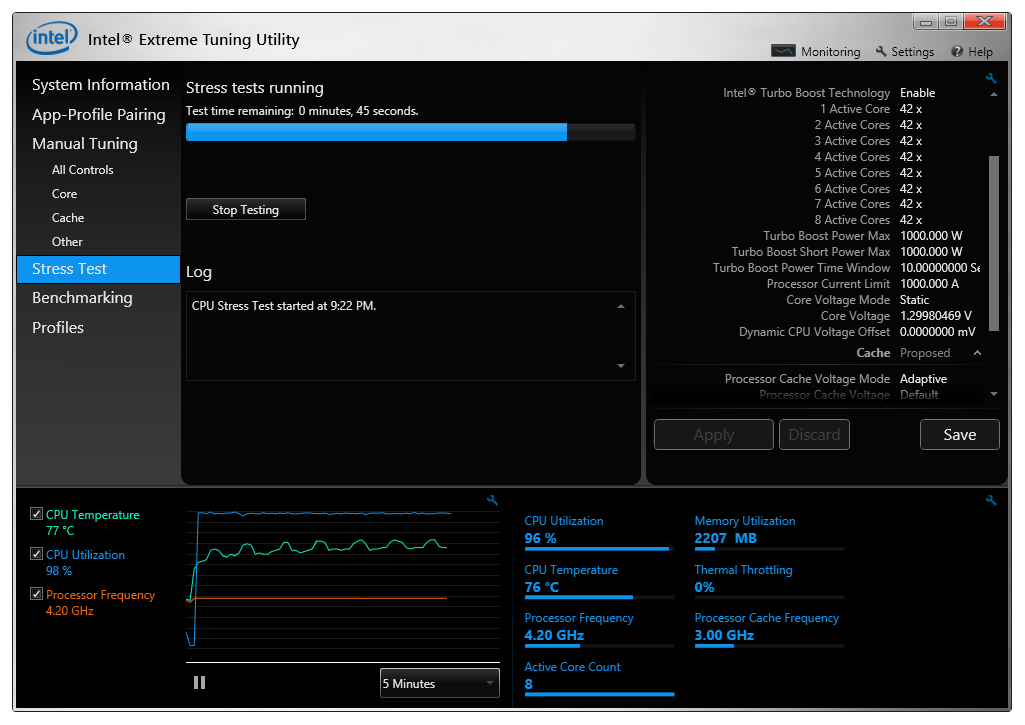
If the system does boot open up Intel Extreme Tuning Utility, and run a Stress Test, at this point we’ll want to verify our changes by ensuring the Processor Frequency matches our desired overclock. We’ll also want to keep an eye on our CPU Temperature readings, anything under 105°C is technically safe for our CPU, however what you’re comfortable with is on you, for the purpose of this guide anything 85°C and below is just fine with us.
If the system fails the stress test, then boot back into the UEFI and add an additional 0.010 voltage, repeat this process until the system is able to boot and pass a stress test. After some trial-and-error, we were able to get our system running fully stable with our 4.2GHz overclock and a voltage of 1.220v.
And …you’re done. Congratulations! you’ve officially overclocked your first CPU!
You overclocked 5960X from 3.0 to 4.2 Hhz (40%). Does that mean I can overclock a 5930K from 3.5 to 4.7 Ghz or somewhere close to that?
Your ability to overclock will vary depending on a few factors:
1. CPU Binning: Some CPUs can overclock higher at lower voltages than others.
2. Motherboard: Some motherboards can handle higher overclocks than others due to their VRM design.
3. Cooling: Obviously, the better cooling performance offered by your cooler the lower temperatures you’ll have, thus higher potential overclocks.
Every X99 motherboard we’ve tested has been able to overclock our 5960X to at least 4.5GHz stable, so we’d say most X99 motherboards will be able to do that without issue, some may just require more tweaking than others. In the case of your 5930K, if sufficient cooling is present and the chip is binned nicely, we’d say you should be able to hit between 4.5-4.7GHz fairly easily.
Hi Donny. Would this guide apply even if I was trying to OC to 4.6 or 4.7?? Or do other parameters come into play at those higher speeds?
Also if my RAM has an XMP profile that sets it to 2666 should that be “on” while doing the initial overclocking… or should I wait until I get a stable OC?
I think the “Adaptive” option should allow for efficient power management of the CPU, but no overclocking guide explains which parameters need twicking and how.
hi i have the same cpu and i cant even oc to 4.0 with out a freeze or something i try evrey single thing try to play with the volt and nothing work im not pass any software strees test only pass in normal 3.6 boost to 3.8 intel that it i want to get over that and icant
Nice guide, very straightforward. I’ve been doing this for a while, my first OC was an Intel 486 DX25 clocked to 50MHz – that’s a 100% speed boost just requiring the addition of a heatsink and fan (no heatsink required at stock). I’m new to the X99 platform though after moving “up” from an X58 and this has given me all the pointers I need.
I’d suggest anyone wanting to go down the OC route should seriously think about buying a closed-loop liquid cooler (a 120mm model with a deep radiator such as the Corsair H80i or Arctic Liquid Freezer will be a great starting place), and a case that’s designed with airflow in mind.
I use an old Lian Li PC-X500 case which offers unobstructed airflow from the front to the back straight over the CPU area and the VRMs, and the lower front fan keeps the GPU and PCIe slots well ventilated. A good case is a long-term investment and will see out several mobo/CPU swaps so budget for one. Sure, if you’ve got a tidy build you’ll want to show it off but for me airflow is everything and should take priority over bling.
As for the liquid cooling, it needn’t cost a great deal more than a good quality air cooler and the closed-loop “all-in-one” units offer a very simple installation with no maintenance required. Importantly, liquid cooling offers a much shorter cool-down time when the CPU punishment stops. A hot-running CPU may seem initially stable but can eventually suffer from a variety of problems that impact stability and longevity. Liquid cooling will keep it temps lower for more of the time, so again make sure you budget for it.