
INTERIOR
One of the first things that many experienced desktop system builders look for in a case is how easy (or difficult) that wiring the components up will be without ending up with a snarled mess; also known as cable management. Looking at the motherboard side of the interior of the case in the image below, we see quite a number of openings in both the motherboard tray and to the right of the tray.
The strip containing five vertical openings that spans the area from the right side of the motherboard tray to the left edges of the upper drive bay cage and the lower HDD cage is actually curved. This curvature allows cables to be fed through and connected with fewer bends in the cables. All of the cable management openings have smooth, rounded edges to prevent cables from potentially snagging or being cut into.

Next we see the motherboard tray area. If using a full ATX motherboard, no standoffs are required, as the board will mount to the nine raised, threaded “dimples” on the tray. If using a mATX board, three brass standoffs are supplied in the hardware kit, to be threaded into three corresponding holes in the tray.
We were a bit skeptical about this “dimple” motherboard mounting configuration when we first encountered it in Cougar’s Archon chassis, as we felt it might compromise airflow in an already tight-clearance area between the motherboard and the tray. Cougar has made this a non-issue by adding several additional openings in the tray that should improve airflow significantly.

My only real complaint about the motherboard tray area is the location of the opening at the upper left. An opening in this area is usually intended for your CPU power connection to pass through. The only way you can utilize this opening for your CPU power connector is to position the cable through the opening and over the edge of the board before securing the motherboard to the tray — there simply is not sufficient clearance for the connector end to pass between the board and the tray once the board is screwed into place.
In the next image, we see the upper 5.25″ drive bay tool-less latching mechanisms. Cougar has come up with a very simple, yet effective method for tool-lessly mounting your optical drive or other upper drive bay device (such as a fan controller or card reader). Merely rotate the knob with the word “gaming” molded into it from the horizontal position to the vertical position (90 degrees), and the latch can be removed. Slide your optical drive or other device into position with the mounting holes aligned with the holes in the drive bay, align the pins on the back of the latch with the corresponding holes, and rotate the knob from the vertical back to the horizontal (90 degrees). Voila! Your optical drive is securely latched into place. Standard screw holes are present on both sides of the drive bays if you choose to secure your optical drive more permanently.

Next we see the HDD/SSD drive cages. The upper cage can house up to three 2.5″ HDDS or SSDs, while the lower cage can house up to three 3.5″ HDDs.

The drive trays themselves are simple to remove and reinstall. Squeezing the exposed tabs away from the cage walls allows you to slide the tray right out, and merely slide it back in until it latches into place. In the image below, we see both sizes of drive trays.

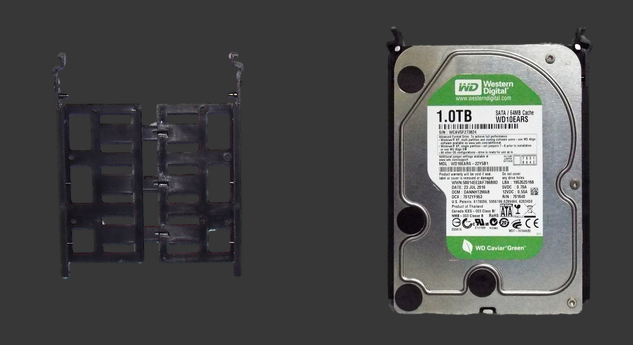
Note the “seam” down the center of the 3.5″ drive tray in the above image. This tray features a very clever tool-less method to mount a 3.5″ HDD. Grasping the sides of the tray and pulling outward (left/right) expands the tray to its “open” position, as seen in the next image below left. Lay your 3.5″ HDD into the tray and align the screw holes in the sides with the pins on the side rails of the drive tray, then squeeze the sides back together to lock the HDD into place. The right-hand image below shows a 3.5″ HDD latched securely into position.
Our final image of the MX300’s interior, before we get into installing components, is of the right side of the chassis. The backside of the motherboard tray and drive cages is, of course, where we would prefer to be able to conceal as much of the wiring as possible. Effective cable management not only creates a clean-looking build, but also maximizes airflow within the case and keeps your system cooling much more efficiently.
