
iFamCare APP
iPhone 6 is our wireless device of choice for this review. Once you’ve followed all the instructions and have your device set up. You should be at the main screen as shown below, obviously with a different picture but with the same options on the page.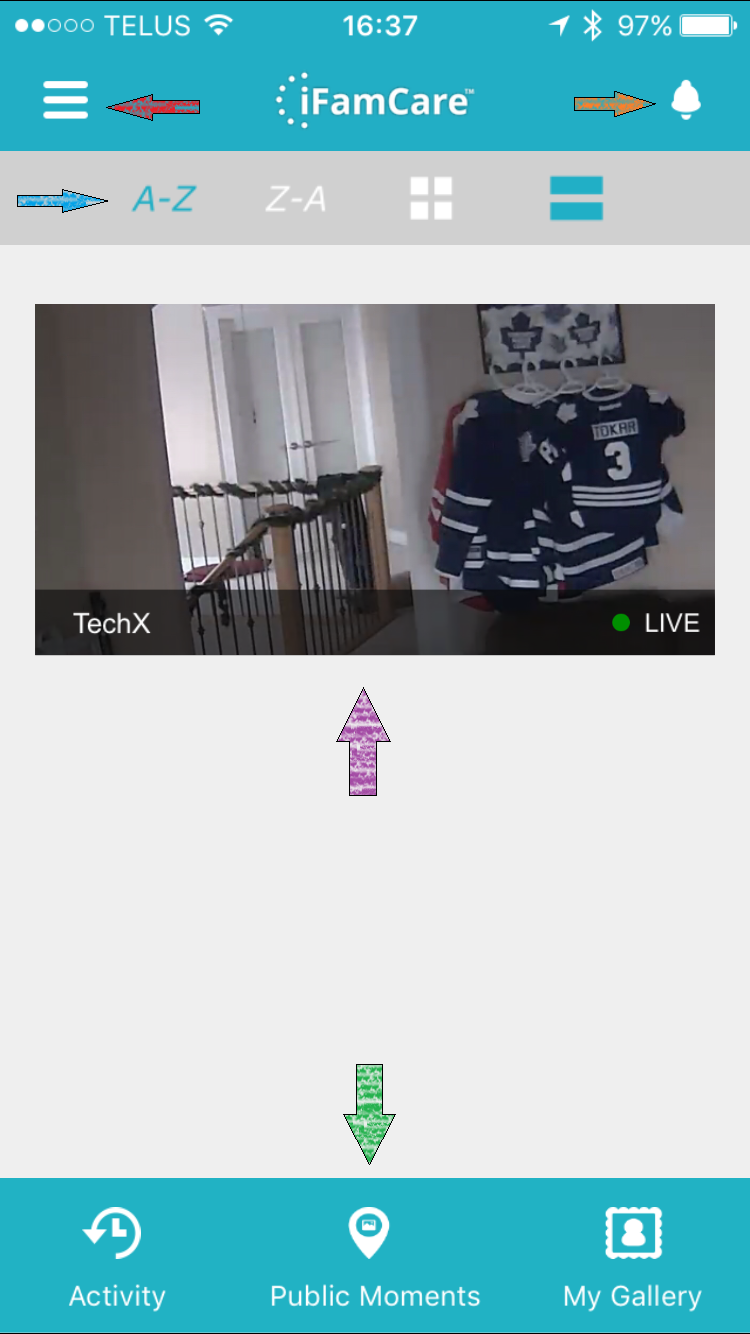 The above image has been labeled with arrows to help walk through the app:
RED – The menu button which you used to install your first camera, you can also add additional cameras. This is also where you will be able to change your account password and add a profile photo if you so choose.
ORANGE – This is the alerts button. On this page you will see any alerts that pop up from either motion or sound if you have turned these options on.
BLUE – This row allows you to organize your cameras from A-Z or Z-A also allowing you to put them in thumbnail size or span the width of your screen per camera.
PURPLE – Camera display, it shows the camera we have set up. If you have multiple cameras they will be listed down.
GREEN – These three options are as follows:
- Activity- This is an activity monitor which chronologically lists which users have accessed which camera, when and for how long.
- Public Moments- This is where you can share your photos with the rest of the iFamCare world as well as see other photos people have posted.
- My Gallery- Simply this is where all your photos and videos are saved.
The Camera page is where you’ll probably spend most of your time, this is accessed simply by touching the camera display you wish to monitor. First things first is the overall use of this page. You can keep your app right-side up or you can tilt your screen to the side for a wider angle. This is a better preference for viewing but don’t worry if you are viewing and recording right-side up it will still record in the full wide-angle. If you wish to move your camera simply touch the screen and slide your finger up/down/left/right and the camera will respond. The video below is a quick 15 second show of the scrolling.
There is about 1-2 seconds of latency with our set up which isn’t that bad since regardless if we are in the same place or 30 km away that it responds pretty much with the same accuracy. When scrolling though it is rather unpredictable how far it scrolls. We would like to see arrows or a set scroll rate per stroke. Not one that is based solely on the speed and distance of your movement. With a 360 degree rotation and a 70 degree swivel for the head you can ensure keeping a close eye on everything in sight.
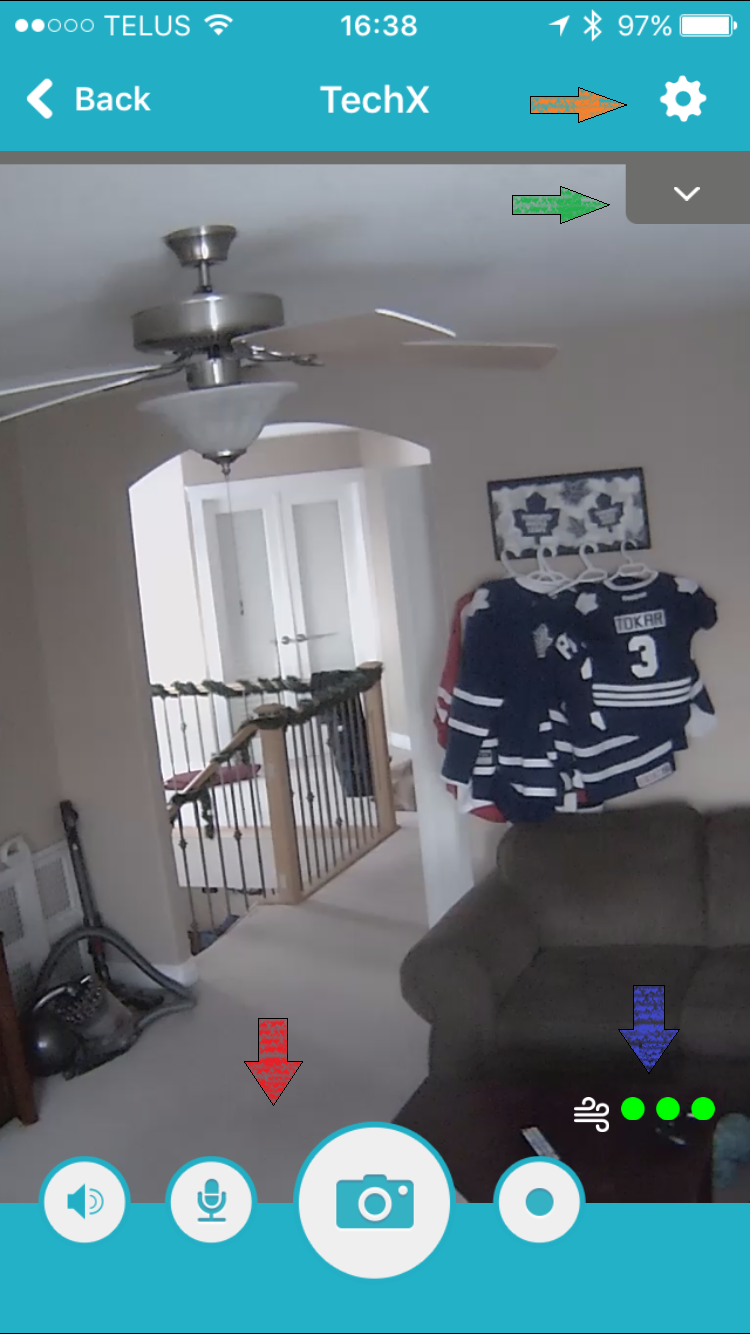 This is the main view of the your camera and allows you the ability to control your Helmet and features. We will walk you around this page:
GREEN – This tab will open up your laser pointer options for playing with your pet while you’re away. In theory this seems cool and fun but there are only a few preset functions for the laser and it automatically starts recording when you play with the laser. This could cause issues with storage if you have a small card.
RED – These four options are fairly self explanatory. from left to right you have:
- Speaker – Allows you to hear what is to be heard in the room. Works Good!
- Microphone – Allows you to talk to the people/pets in the room. Works decently with some distortion in our set up. If a person was further away it was sort of hard to hear what they were saying in a normal voice.
- Camera – This will take a picture of what you see on the screen.
- Dot – This dot is the recording button. If you wish to manually record.
BLUE – Air quality sensor, this will keep track of the air quality in the room. With three green dots being the best.
ORANGE – The gear wheel will open up the settings for the selected Helmet.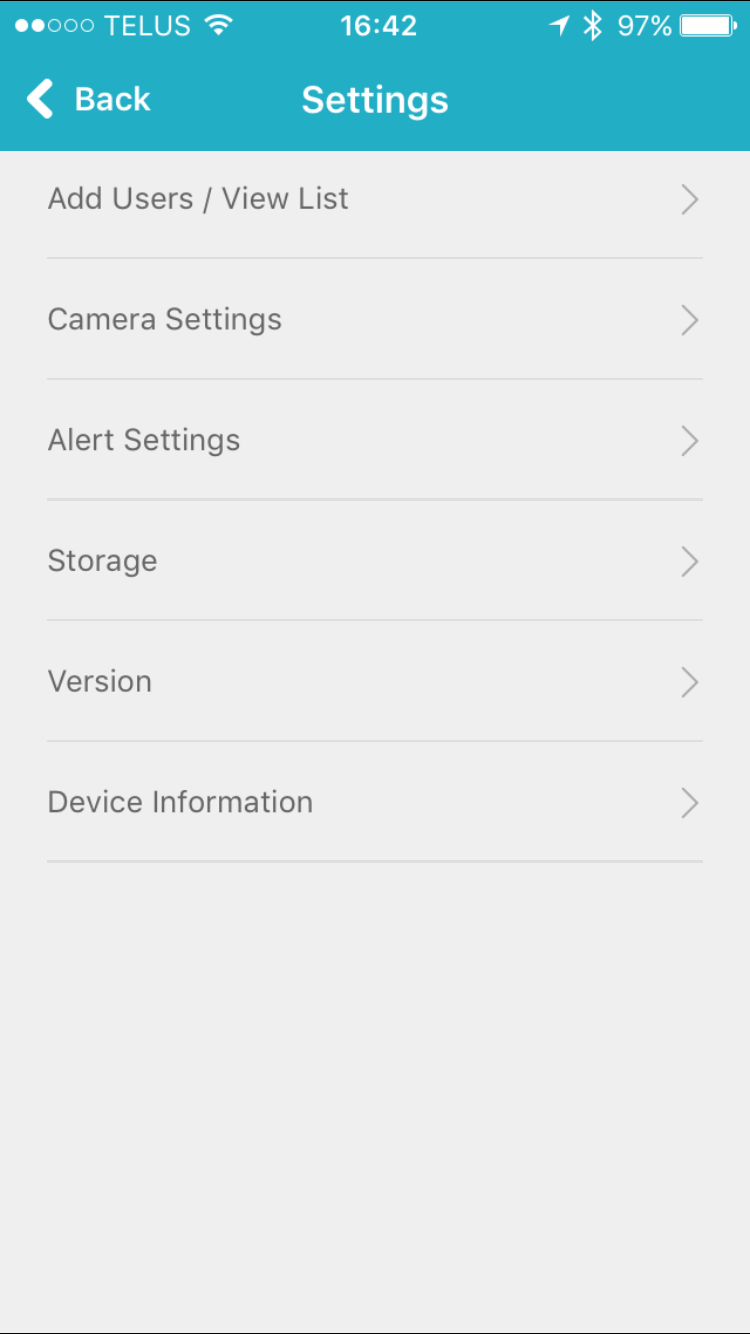 The first option here is to add users/view list, Here you will be able to add and invite more users to access the Helmet. This is a bold option as most home security systems are geared towards privacy this one is boasting the ability to public. Very unique and once you get into the finer details you can choose what each user is capable of doing, from just being able to see the screen to having complete control just as an admin. Next you will see the “Camera Settings”, which will bring you to the display settings page below.
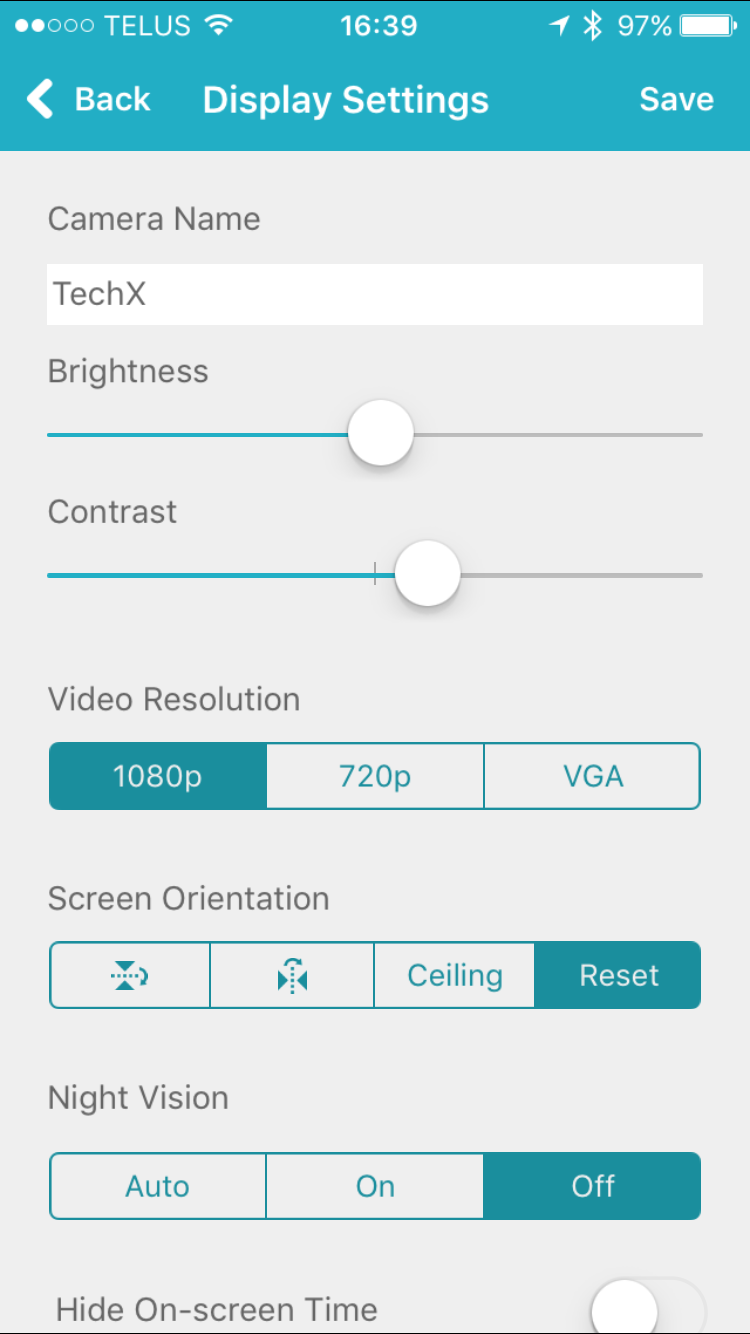 On this page you will be able to change the name of the selected monitor, which is helpful if you have multiple monitors. everything is fairly self-explanatory except the “screen orientation”. The first two options had us a little boggled until we tried them out, the first one makes your view upside down, second makes everything completely opposite sided (Not sure what the function of this would benefit besides confusion), Ceiling is the option if you are mounting this on the ceiling and reset is the option to keep everything normal. Night vision is available if you so chose to use it there is an auto-function for when it gets a little darker in the room or after all the lights are out and people are in bed. Hit the back button and the next option on the list is “Alert Settings”.
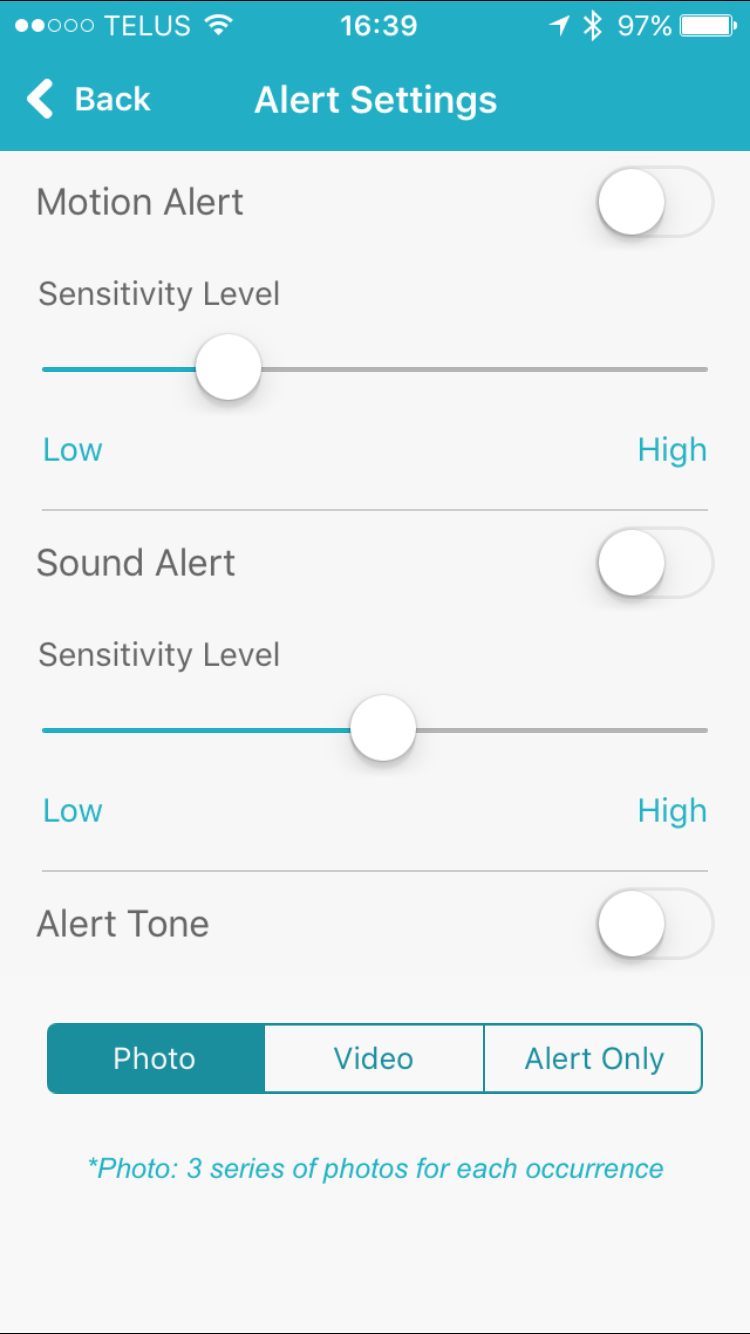 This page will allow you to take home security to the next level by having alerts sent to your phone for motion or sound within the Helmet range. At the bottom you’ll also have the option to take photo, video or just receive an alert when the sensor is tripped. Only issue we found here is that the video is all stored on the SD card so if you do not connect to the app quick enough after the alert and upload it you may not have it if someone steals the camera or SD card in there robbery. But hopefully we don’t have to worry too much about that and can enjoy the Helmet for it’s fun capabilities. The final settings page has to do with Storage, this is where you will format your SD card and chose to use SD recording or not.
 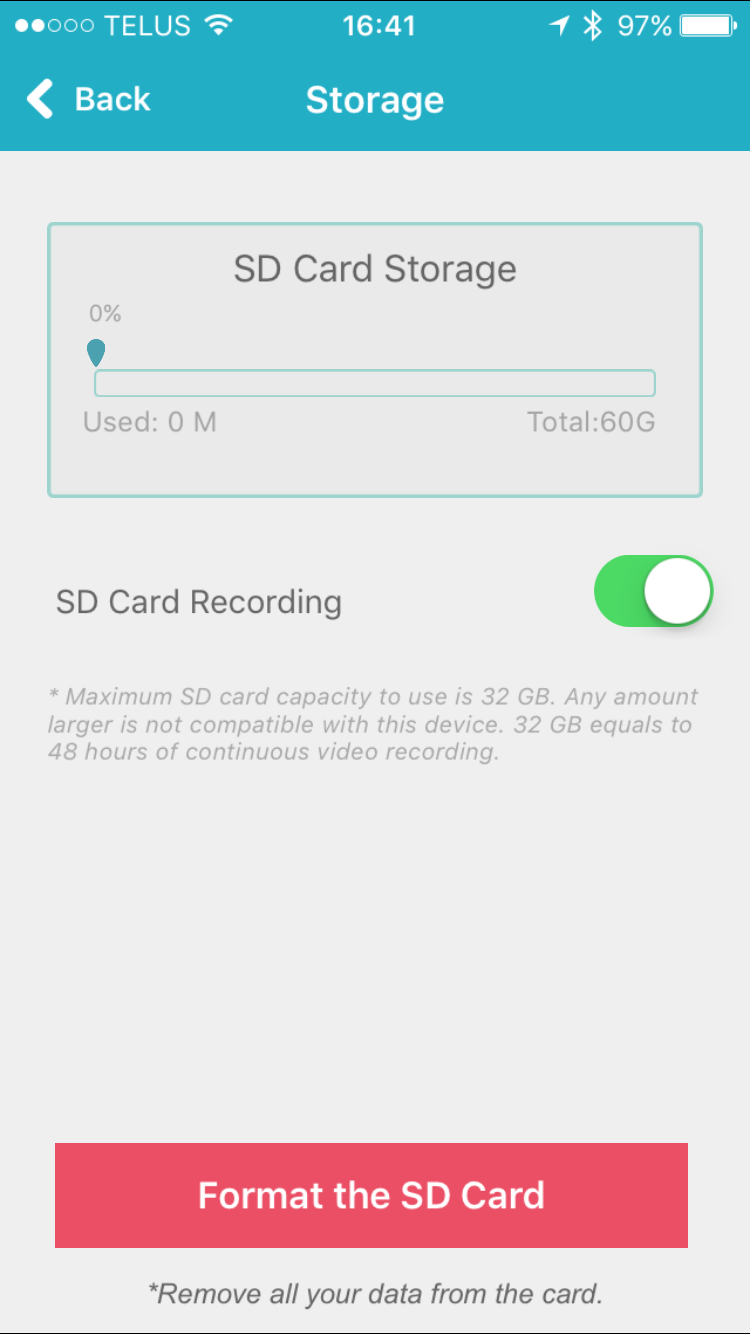 Ensure that you do not use an SD card above 32 GB as it is not compatible with the Helmet. We tried using at 64 as we said earlier in our set up and this is where we ran into issues. The photography worked great but unfortunately the video would not save. So when we used the 15 second video alert recording. We received the alert but no video was present on the app. So stick to 32Gb or less as the warning says.
CUSTOMER SERVICE
With devices like these sometimes we like to see what the customer service is like and how knowledgeable they are of the product in case the consumer runs into issues. In this case we called in it was simple enough. Posing the issue of not being able to connect through the app. Our customer service rep, Bricio, was quick to help, assess and trouble shoot the situation and our call lasted around seven minutes from dialing to hang up. Very impressed and happy to see the effectiveness of their customer service team.
Review Overview
Packaging & Allure
Ease of Use
Features
iFamCare App & Customer Service
Price
Stay Connected!
iFamCare's Helmet is a great product at a reasonable price.